By default, WordPress only ships with Posts, Pages, and Attachments as supported post formats or types. But you aren’t limited to the default post types. WordPress lets you create your own and it couldn’t be easier.
In this article, I will guide you through creating your first custom post type…
What Is Custom Post Type?
Before we create our custom post type, let me explain what it is.
Posts, Pages, Attachments, and Revisions are all stored in the same table in your WordPress database. The only difference between all these different types of posts is a column called post_type that defines the type of the post.
What this means is that you can store any sort of data as a post. WordPress saves the navigation menus that you create in the posts table with a post type of navigation menu. The same goes for the Custom CSS you add from the Live Customizer.
A Custom Post Type is only displayed on the front-end of your website if you choose to make it public. A lot of plugins create custom post types to store internal data created by the user.
Here are some examples of custom post types:
- Recipes for food recipe sites.
- Products for an eCommerce site.
- Portfolio items for your personal portfolio site.
Many of the popular WordPress eCommerce plugins store products as a custom post type. Think of a custom post type as a collection of objects. What data these objects store, and who can see them is totally up to you.
How To Create a Custom Post Type
Although you could create a custom post type from your theme’s functions.php file, the best way to create a custom post type is by creating a custom plugin. Otherwise, if you ever decide to change the theme of your blog, you will have to go through a lot of pain to migrate the custom post type to your new theme.
Use our plugin header generator to get the basic boilerplate template you need to create your plugin.
Now, WordPress makes it really easy to create a new custom post type. All you have to do is call the register_post_type function with arguments describing the new post type:
function register_my_custom_post_type() {
    // Labels for the post type.
    $labels = array();

    // Arguments to pass to register_post_type.
    $args = array();

    // Register the post type.
    register_post_type( 'recipes', $args );
}
add_action( 'init', 'register_my_custom_post_type');
The above code is a bare-bones version of what it looks like. If you were to put this code into a plugin file or your functions.php file, you won’t see anything new on the dashboard because this code doesn’t define where this new custom post type is to be displayed.
This code is executed on WordPress’s init hook. It registers a new post type called recipes which is the first argument of the register_post_type function.
In the above code, you will notice two arrays: $labels and $args.
The $labels array will contain a key-value pair of the labels you want to use for this custom post type. It will be passed inside the $args array.
The $args array contains the arguments that control how your new post type will behave and where it will be displayed.
Let’s explore both in more detail:
The $labels Array
First, let’s go over some of the basic labels you should rewrite using the $labels array:
- name: The name of your post type. Make it plural. For example, Recipes.
- singular_name: Singular name of your post type. For example, Recipe.
- add_new: The label for the Add New link in the sidebar.
- add_new_item: This will be the title of the Add New Post page for this post type.
- view_item: Label for view item link in the posts list in the dashboard.
- search_items: The label for the search button on the Posts page.
- not_found: Label when there are no posts of this type shown on the Posts page. Default: No posts found.
- not_found_in_trash: Same as above for trash.
- edit_item: Label for the edit post link in the admin bar.
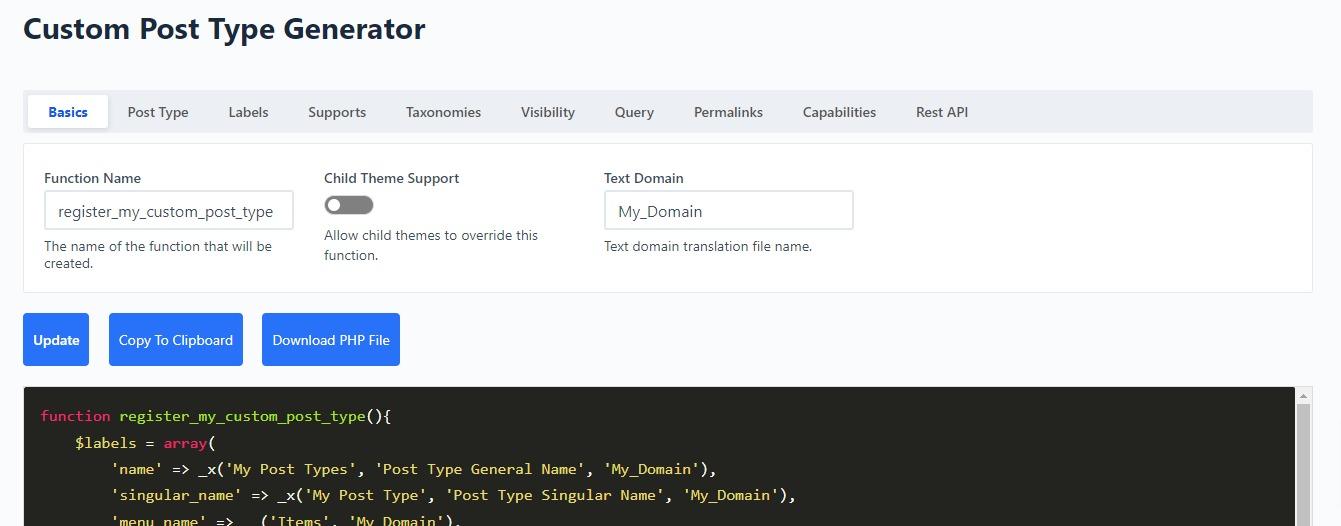
If you want to customize all the labels available, check out our Custom Post Type generator. It lets you customize all the labels and lets you go beyond the basics.
The $args Array
Now, let’s go over the arguments that you can pass in the $args array:
- public: Controls whether or not this taxonomy is queryable and displayed in the admin dashboard. This argument is a shorthand for a lot of other arguments that let you fine-tune where this custom post type is displayed. In most cases, you will want this to be true.
- hierarchical: Pages in WordPress are allowed to have parent pages. Do you want to allow your custom post type posts to have a parent? This will let the admin assign a parent of the same type to the post.
- has_archive: This controls whether or not there are archive pages for this custom post type. Archive pages are where all the posts of a type are displayed.
- labels: This is an array of key-value pairs of labels for your post type.
- supports: This lets you decide what built-in features are included with this post type. title, editor, excerpt, and thumbnail are some of the features you can enable.
- taxonomies: This lets you connect your post type to built-in as well as custom taxonomies. At a bare minimum, you will want to enable the Category taxonomy for this post type.
- show_in_rest: Do you want this custom post type to be enabled in the WordPress REST API?
- rewrite: This lets you change the slug that is displayed for this post type in the URLs. It also lets you control other rewrite factors.
These are only some of the arguments that are at your disposal when creating a custom post type. These are the ones that you will most likely use. If you want finer control over your custom post type, I highly recommend using our Custom Post Type generator. It offers dozens of options to fine-tune your custom post type.
A Quick-Start Template
Putting together what we learned above, we come up with the following code. It is all you need to get started with Custom Post Types. If you place this code in your theme’s functions.php or in a plugin file, you will be able to display this new Custom Post Type on the front-end wherever you want, and it will act almost exactly like Posts and Pages.
function register_my_custom_post_type() {
    // Labels for the post type.
    $labels = array(
        'name' => 'Recipes',
        'singular_name' => 'Recipe',
        'add_new' => 'New Recipe',
        'add_new_item' => 'Add New Recipe',
        'view_item' => 'View Recipe',
        'search_items' => 'Search Recipes',
        'not_found' => 'No Recipes found',
        'not_found_in_trash' => 'No Recipes found in trash',
        'edit_item' => 'Edit Recipe',
    );

    // Arguments to pass to register_post_type.
    $args = array(
        'labels' => $labels,
        'public' => true, // Allows you to query the post type on the front-end.
        'has_archive' => true,
        'supports' => array(
            'title',
            'content',
            'author',
            'editor', // Enable the Gutenberg Editor.
            'featured-image',
            'excerpt',
            'revisions'
        ),
        'show_in_rest' => true, // Required for the Gutenberg Editor.
        'taxonomies' => array(
            'category', // Add category taxonomy support.
            'post_tag', // Add tags support to the post type.
        ),
        'rewrite' => array(
            'slug' => 'recipes',
        ),
    );

    // Register the post type.
    register_post_type( 'recipes', $args );
}
add_action( 'init', 'register_my_custom_post_type');
Note: A Custom Post Type doesn’t show up in the blogroll on the front-end by default the way posts do. You need to create pages that display your custom post type as I will explain in the final section.
This code is a great place to start. If you want to customize your custom post type’s features, you can use our custom post type generator. It offers dozens of options for everything and lets you customise all aspects of your custom post type:
How To Enable The Gutenberg Editor For Your Custom Post Type
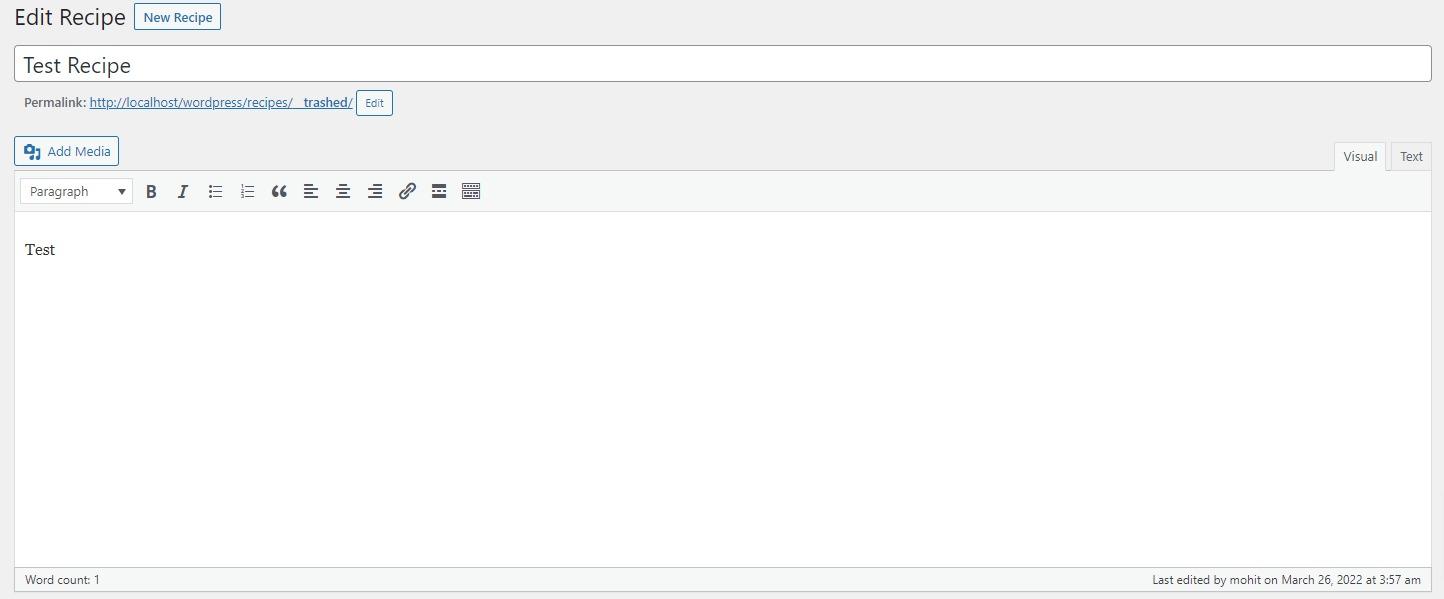
By default, your custom post type will only be editable in the classic WordPress editor:
If you want to enable Gutenberg for your post type, you will need to pass editor as one of the supported features in the $Args array. If you want the classic editor, remove editor from the supports array.
You will also need to enable show_in_rest because Gutenberg Editor needs access to the REST API.
This is what it would look like:
// Arguments to pass to register_post_type.
$args = array(
	‘show_in_rest’ => true,
‘supports' => array(‘editor’),
);
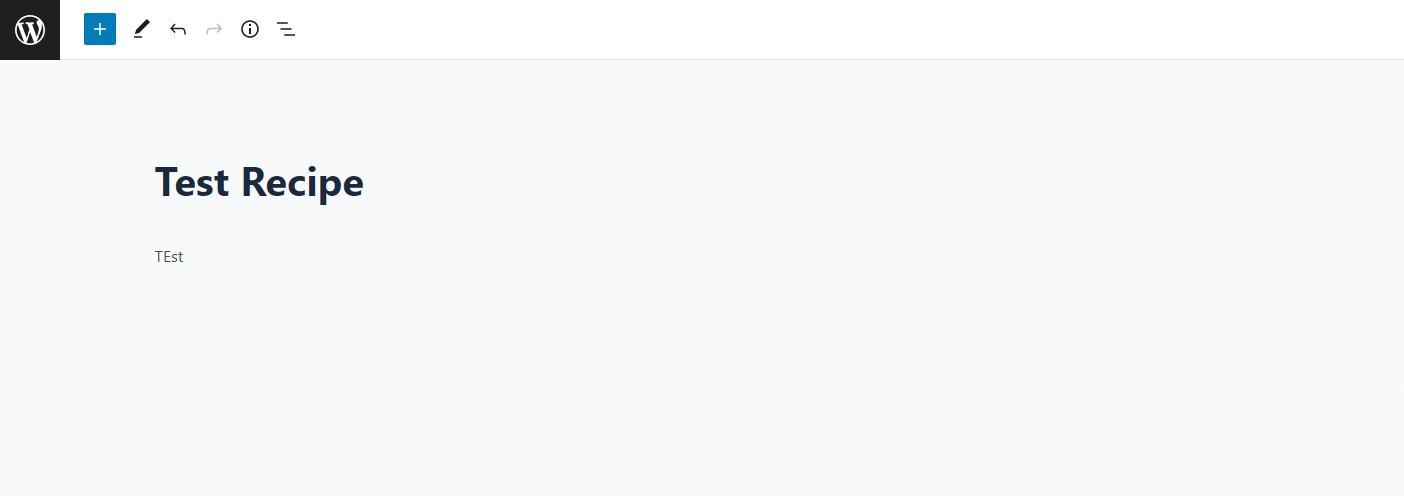
Once you add these two options to your $args array, you will be able to edit your posts using the Gutenberg Editor:
What Is A Custom Taxonomy?
When talking about Custom Post Types, the topic of taxonomies always comes up.
Taxonomies are basically tags that help you categorise your posts. Categories and Tags are two default taxonomies that come built-in with WordPress. Taxonomies can be linked to any post type and vice versa. You can enable Categories for your custom post types and enable your custom taxonomy for any post type.
WordPress offers some really easy options for creating your own custom taxonomy. If you work with WordPress a lot, you will often need to create custom taxonomies for your custom post types.
How To Create a Custom Taxonomy For Your Custom Post Type
Creating a WordPress taxonomy is similar to creating a custom post type and even looks very similar.
Here’s the basic code you need to create a new custom taxonomy:
function register_my_taxonomy(){
	$labels = array(
		'name' => 'My Taxonomy',
		'singular_name' => 'My Taxonomy',
		'add_new_item' => 'Add New',
		'edit_item' => 'Edit My Taxonomy',
		'view_item' => 'View My Taxonomy',
		'not_found' => 'Not found',
		'no_terms' => 'No items',
	);

	$args = array(
		'labels' => $labels,
		'public' => true,
	);

	register_taxonomy( 'my_taxonomy', array('recipes'), $args );
}
add_action( 'init', 'register_my_taxonomy' );
This code is all you need to create a new custom taxonomy. As you can see it’s very similar to the code for registering a custom post type. You have to pass an array of post types you want to connect this taxonomy to as a second argument to the register_taxonomy function.
If you want to be able to customize the behavior of your custom taxonomy completely, check out our custom taxonomy generator. It offers dozens of easy options to customize your custom taxonomy and generates the PHP code in just one click:

How To Display Your Custom Post Type Posts on The Front-End
Most themes don’t display custom post type posts on the front-end by default. Some themes offer options that let you choose what types of posts are displayed. Most likely you will only create a custom post type when you want complete control over where and how it is displayed.
Fortunately, there are two easy ways to display custom post types on your website. One is to add the archive page of your custom post type to your menus; another way is to display them programmatically where you desire using PHP.
Here’s how to do both:
Option 1: Add The Custom Post Type’s Archive Page To Your Header Menu
The archive page of your custom post type is enabled by default if you make your post type public. It displays all your custom post type posts just as your blog page lists your regular posts.
To make this page accessible to your visitors, add it to your navigation menu.
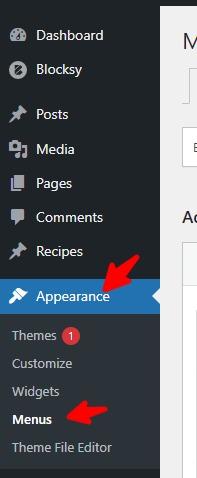
Navigate to Appearance -> Menus from the Dashboard:
Now, from the Add menu items section, find your custom post type and select view all and add the archive page of the same name to your menu:
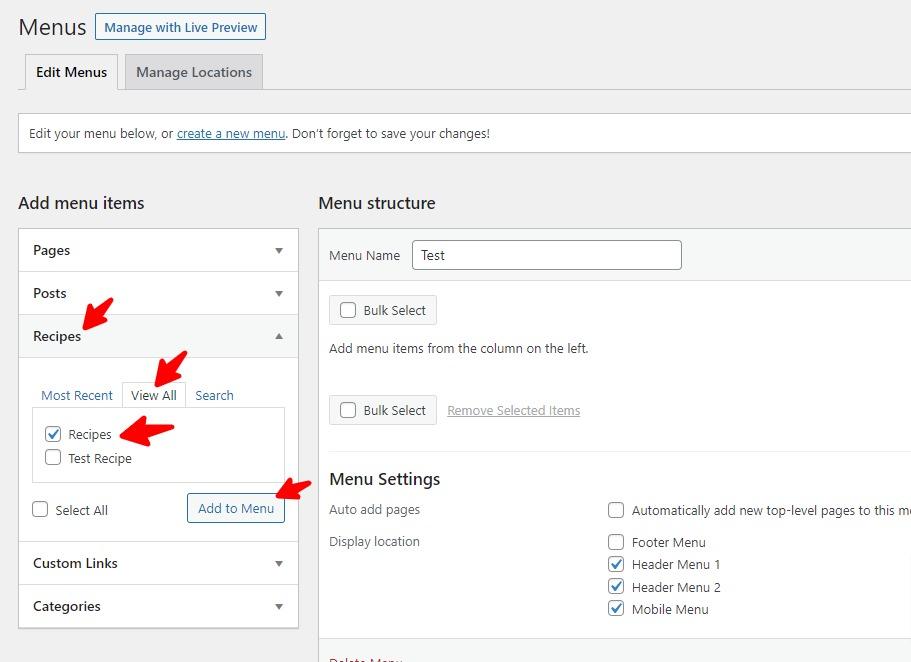
Once you click the save changes button, your visitors will be able to see a link to your custom post type’s archive page:

Option 2: Display Using PHP Query
Displaying custom post type posts on the front-end is just as easy and simple as displaying any other regular post types such as pages and posts. And yes, you get to use the template functions such as the_title and the_content!
You can display posts of your custom post type anywhere you want on your website using some simple PHP code.
To display your custom post type posts, just change the name of post type from recipes to your custom post type in this code:
$args = array(
    'post_type' => 'recipes',
);
$recipes = new WP_Query( $args );

if( $recipes->have_posts() ) {
    while( $recipes->have_posts() ) {
        $recipes->the_post();
        ?>
        <h2><?php the_title() ?></h2>
        <div class='content'>
            <?php the_content() ?>
        </div>
        <?php
    }
}
else {
    echo 'No Recipes Found!';
}
WP_Query is a powerful class that makes it really easy to query posts and filter them. There are dozens of options you can change to filter the posts that are displayed.
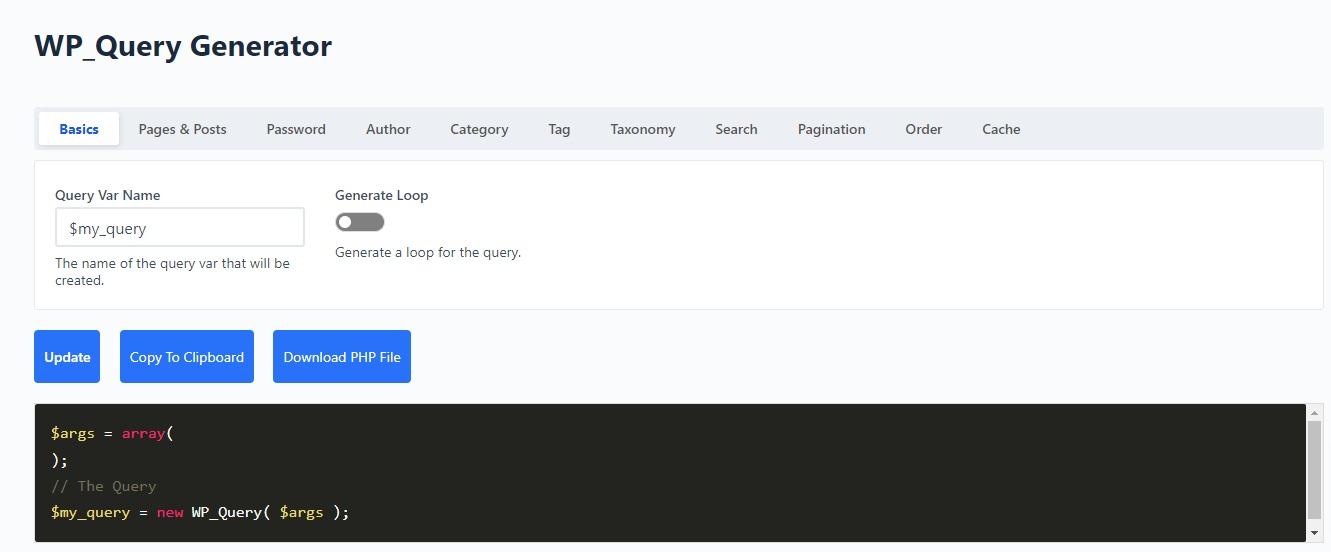
Use our free WP_Query generator to customize your query with easy options, and generate the PHP code:
Leave a Reply